Painted Floor Cloth
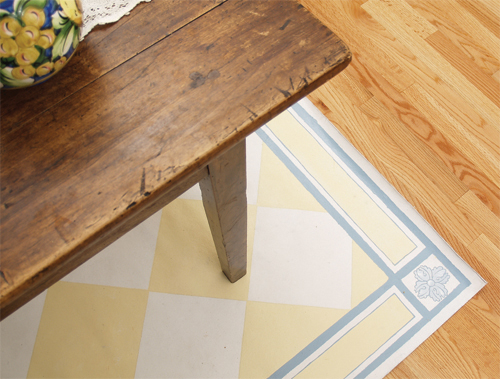
Hand Painted Checker Board Floor Cloth
The magic of a painted floor cloth can transform a common space into a unique and beautiful expression of you and your family’s personality. I often paint these versatile cloths for entrance floors, children's rooms, porches, or just about anywhere. The center field starts with a 2 color process, and then I introduce a third color to enhance the boarder. Using the English Country color palette I’ve found it quite easy to create a country feeling while having a movable carpet that is easy to clean and store. Due to the hand painted nature of each floor cloth there is a great opportunity to customize an interior detail to the home, adding quirky elements and personal touches that help create these singularly unique painted floor cloths.
Special Feature
English Country Style
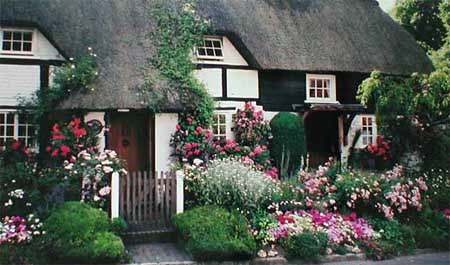
In the English countryside, pretty villages dot rolling hills and cobblestones line narrow medieval streets. Come in through the garden gate, and you'll find a steep thatched roof overhanging ancient leaded glass windows. Old garden roses creep around the carved oak door. The grounds, whether a picturesque cottage garden or the rolling parkland of the local manor house, are lovingly cared for. Everything is fresh, tidy, and welcoming.
Color Palette
Color 1 – White Dove

Color 2 – Yellow Daisy

Color 3 – Wedgwood Blue

About floor cloths
Generally a floor cloth is made from painted canvas. I use 18 oz. unprimed cotton duck canvas, often used as floor cloth due to its extra heavy weight. You can also purchase a pre-primed canvas.
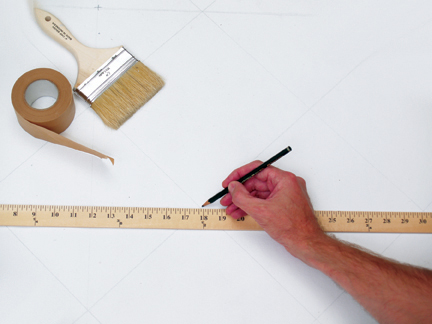
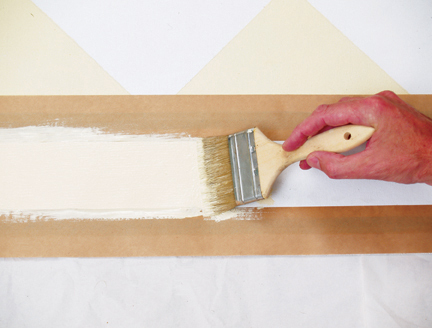
Step 1:
Applying the primer and base color.
After laying the floor cloth out I prime the canvas using the Acrylic Primer. Once dry I apply a finished coat of white latex paint as my background color.
Step 2:
Creating the pattern
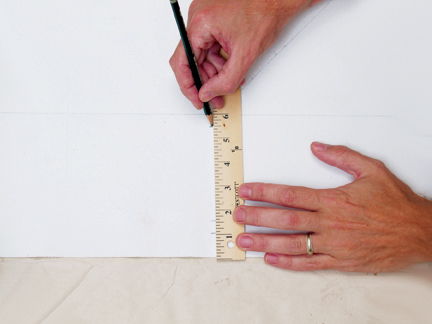
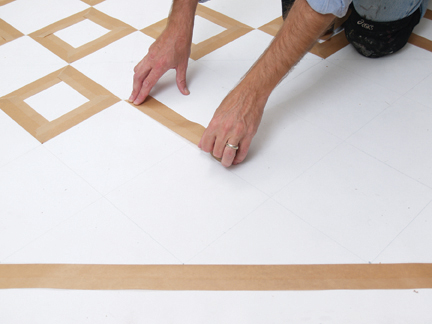
First I determine the size of the outside border. Since 1 am creating a 5 ft x 7 ft floor cloth, 5 inches is a nice size, without seeming too large for the cloth size. The width of my boarder is 5 inches, so I’ll create a frame that is ½ inch thick on each side. I start 1 inch away from the canvas edge and mark a line at the 1 inch, 1 ½ inch for outside frame profile, and again at 5 ½ inch and 6 inches to define the inner frame profile. Repeat this every 18 inches or so until you complete your guideline markings. If you are creating very large floor cloth, then a larger boarder will be necessary.
Step 3:
Diagram 1
Once I have completed marking my boarder I move to the center panel and begin marking for my checker pattern. First find the center point by drawing a diagonal line from on corner of the floor to the other. Repeat this starting from the opposite corner, where the lines cross you will find your center point. We are using 9 inch squares, and placing them on a diagonal.
Creating a straight checker pattern versus a diagonal pattern I like creating a checker board pattern on an angle because I feel it adds interest and energy to the linear space. For an easier approach, you can also create a straight checker pattern (or grid) by simply marking 9 inch lines in an even progression along each side of the canvas and then connecting the points with straight lines.
Step 4:
Diagram 2
4. Start creating a series of parallel lines. You will do this by measuring 9 inches along one center, then repeating the measurement at another point along the same line (dia. 2). Connect with your straight edge and pencil. Continue this method, measuring at 9 inches off each newly created line.
Step 5:
Diagram 3
Draw the opposing diagonal lines by repeating the process along the opposite axis point until all lines are created. Pay close attention to the pattern to insure you stay consistent and create equal and parallel lines.
Step 6:
Use the painters tape and carefully tape off every other square. Carefully place the tape along the pencil outlines. Use a razor blade, placing it at the cross section of the squares, and tear the tape against the blade to insure crisp corners.
This may seem like a time consuming process, and it does take a while. But once you complete this stage you are almost done. Simply paint the squares, remove the tape and voila!
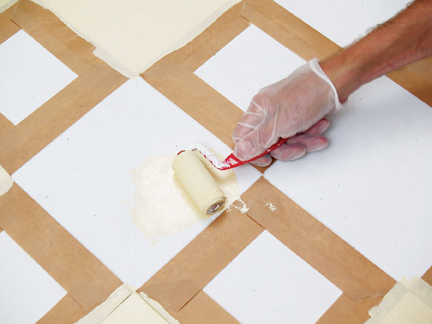
Step 7:
Painting the secondary color
Pour the secondary paint color, Yellow Daisy, into the mini-roller tray. Wear disposable gloves and carefully roll on paint, being cautious not to paint over a 'white' square. When I’ve completed this step I put the wet roller into a small ziplock back to use in one of our later steps.
Step 8:
Our floor cloth in process...
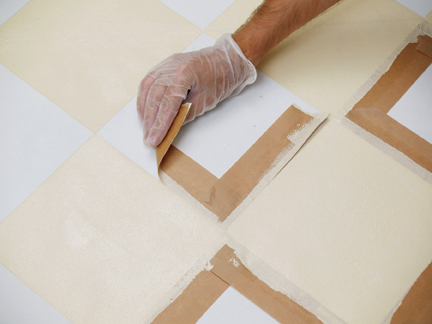
Step 9:
Removing the tape and finishing off
While the paint is still wet carefully remove the tape. Have a trash bag handy for tape disposal. Be careful not to step in any 'wet paint' areas.
Step 10:
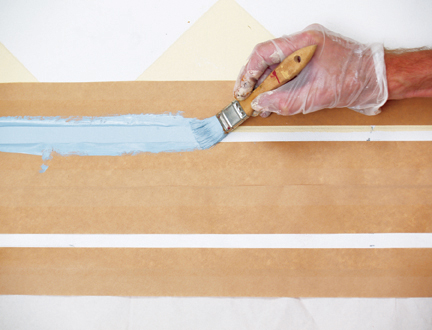
Painting the boarder
I’ve selected a Wedgwood Blue color to use as my border tone. I’ll measure ½ inch lines and mark these with a pencil as a guide for my boarder outline. Next, apply tape to the markings.
Step 11:
Use a 1 inch brush and paint over the tape. Immediately remove the tape to expose the completed line boarder.
Step 12:
To balance the overall appearance of the floor cloth I’ll add more of the Yellow Daisy paint to the center panel of the border lines. Marking a ½ inch in from the border edge, I’ll tape the area off and use the mini-roller to paint this area. Again, I’ll remove the tape immediately after I complete each section.

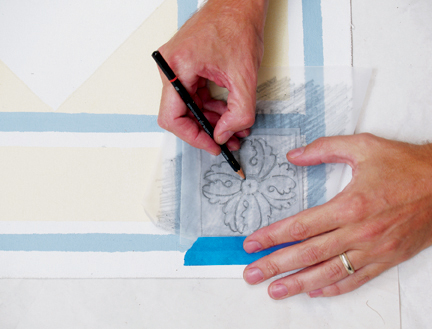
Step 13:
Using the ‘transfer method’ from page XX I mark the outline of my floral motif in each corner.
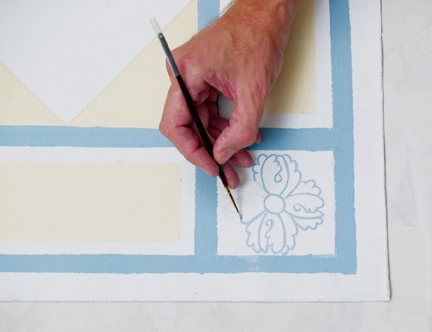
Step 14:
A no. 2 brush is used to outline the shapes with the Wedgwood Blue paint..
Step 15:
I mix some white paint with the Wedgwood Blue to create a lighter color for my corner motifs. Paint these elements using the No. 2 brush.
Step 16:
A clear coat sealer is recommended as a final application to insure durability. I’ve found that a waterbased Satin sheen sealer work well for most environments.
Early American Style
Colonial Amercians drew inspriation from their European heritage. Curent design styles would filter across the ocean and become reinventedin early America. Proportion and scale took reign over ornementation, A neutral color palette of grey blue, greens and rose pinks is readily apparent.
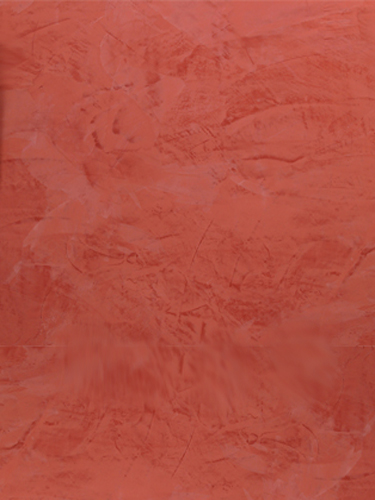
Venetian Plaster
Polished Plaster, or Stucco Veneziano, is a Traditional wall treatment that provides a glossy, visually textured wall finish. Venetian Plaster is a natural formula composed of organic ingredients, calcium, and acrylic binders creating a decorative paste plaster for interior applications. Polishing the surface compresses the calcium within the compound, creating a narble-like finish, cool and hard to the touch.
This treatment is quite versitile, ranging from a rustic backdrop to a refined and elegant finish.

The Rustic Color Palette
The Rustic Style color palette falls within a distinct range of color tones and is essential in creating a successful Rustic interior. By using the appropriate color tones you can create a variety of design styles ranging from Period and Historic, regional or thematic. Color helps define our experiences within an interior and exterior environment. It affects us on a physical, emotional, and spiritual level and can be calming and passive, expressive and vital.
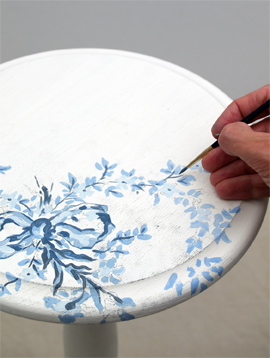
Painted Floral Details
Floral patterns used as accents in fabrics and furniture are common place details in the English Country home. These graceful and organic patterns complement the cozy interior of this style and work particularly well with lace window treatments, an heirloom tea service set and the natural and rustic charm of wooden ceiling beams and slightly irregularly textured walls.