How to Create an Antique Glaze
Timeless glazing techniques for aging furniture, objects, and decorative surfaces
Transform everyday furniture and decorative objects into heirloom-quality pieces using simple, proven antiquing methods. Antiquing is the process of intentionally aging a surface to create a naturally time-worn, historic appearance.
Antique glazing remembers time. By selectively applying translucent layers of color, antique glazes settle into recesses, soften edges, and enhance surface detail—mimicking the effects of years of wear and handling. This technique is widely used on furniture, picture frames, architectural details, walls, and fine art surfaces to introduce depth, warmth, and visual complexity.
Antique glazes can be created using either water-based or oil-based glazing mediums, each offering distinct working characteristics. Water-based glazes provide faster drying times and easy cleanup, while oil-based glazes allow for extended working time and smoother blending. Both approaches can be customized with paint, pigment, or stain to produce subtle patinas, dramatic aged effects, or refined old-world finishes.
Whether your goal is rustic charm, classical elegance, or softly worn sophistication, antique glaze finishes are an essential technique in decorative painting—bringing history, character, and craftsmanship to both traditional and contemporary designs.
How to create an Antique Glaze
There are many methods of antiquing, and mastering these few simple steps you'll be able to successfully handle the antiquing of untold objects, furniture, mural paintings and wall surface finishing.
Antiquing TIPS
Create a history for your antiqued objects. I’ve discovered that the best approach to antiquing is to think in terms of the passage of time. What would happen to any given object as it matured through time? Passing from one owner to the next, or resting quietly in the back of a dusty shop. Dirt starts to settle. As people clean or move these objects around, the high points, edges and top would naturally be exposed to polishing, rubbing or knicks and dings. Meanwhile, the recesses and deep areas slowly become more distinguished as they settle and mature. In step 8, above, we see just that. The buffing of the ‘high traffic’ points, while our newly applied antique glaze stays put in the details.
The 'Classic Antique Glaze'. A blending of Raw Umber, Van Dyke Brown and Burnt Sienna colorant.
Base Color Antique White - Latex Eggshell
Glaze color Classic Antique Glaze

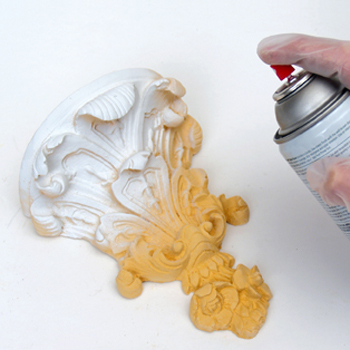
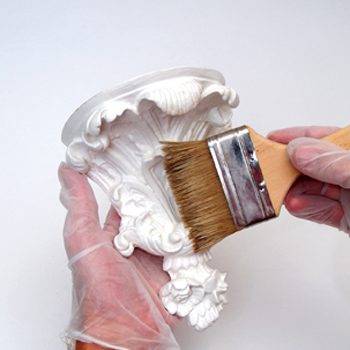
Step 1: Prime Object.
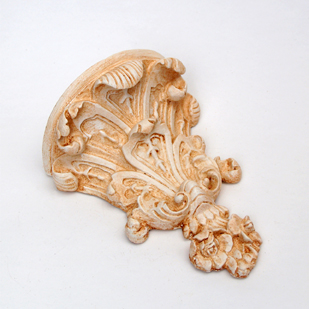
Ensure that the object being antiqued is suitably primed. In this instance I’ve decided to antique a set of decorative wall brackets. Since they are cast in plaster I will need to prime them by using an aerosol white primer.
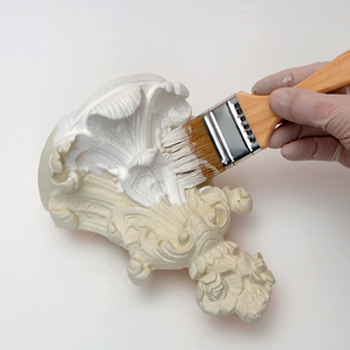
Step 2: Apply base coat.
Apply 2 coats of latex Antique White paint. Establishing a light base color allows the antique glaze to differentiate from the base color, taking on depth and richness of tone.
Special Feature
Painted Stripes
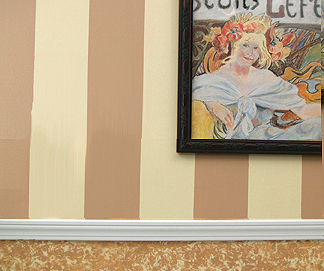
Smart, bold and uplifting, striped walls can quickly transform a modest room into an exciting environment. From elegant and formal to casual and comfortable, the painted stripe offers a variety of design solutions and can be quickly adapted to your interior style. Because of the linear quality of this application rooms tend to feel larger. It works well in entrance foyers, living rooms, dining rooms and bath areas.
Antiquing Video Tutorial
Turn ordinary objects into heirlooms! Creating the 'Classic Antique' glaze finish for objects, furniture, walls and more. This detailed step-by-step tutorial shows how to mix the right colors to create the perfect antiquing solution for any object, furniture, picture frame and more.
Step 3: Create 'Classic Antique Glaze'.
To create the artSparx 'Classic Antique Glaze', loosely mix together Raw Umber, Van Dyke Brown and Burnt Sienna in a 4:2:1 ratio onto the paper palette. This is not an exact science so use your color sensibility to adjust the glaze as desired.
This random mixing of the colors, in a not so scientific manner, allows for small variations of color on the object during application. This will further enhance the mottled and aged appearance of the object or surface.
For larger surface areas, follow the Parchment Glaze step-by-step tutorial.
Step 4: Wet surface.
Use a damp rag and wet the working surface with water. This helps your glaze to move fluidly while also extending drying time.

Step 5: Apply glaze.
Brush the antique glaze you created loosely over the entire surface.
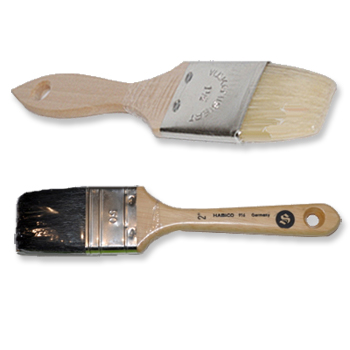
Varnish Brushes
Finishing Venetian Plaster with natural polished marble effect
Varnish Brushes
Highest quality flat brushes for the application of varnishes. These brushes are made of high quality natural hairs. Square brushes allow precise application of material, excellent coverage and consistent build-up of material. These square brushes are the applicators of choice for base coats of oil paint, sealers, primers and top coats of glazes.
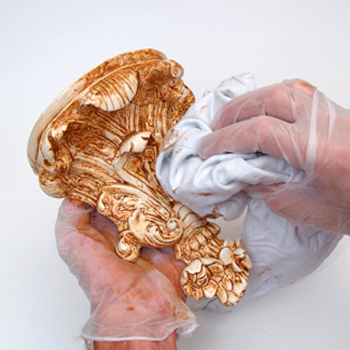
Step 6: Rub glaze with rag.
Ball a clean rag in your hand and then lightly rub over the antique surface with the rag. This will remove glaze from the higher points, creating contrast by allowing the recesses to remain darker, thus exaggerating the natural shadows of your object.
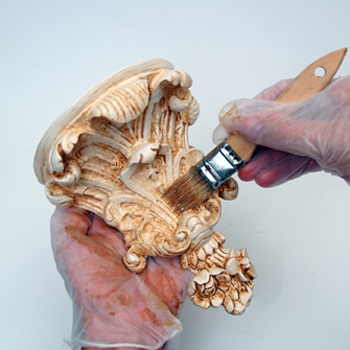
Step 7: Drybrush.
With the dry brush, gently work over the surface, evening out concentrations of antique glaze.
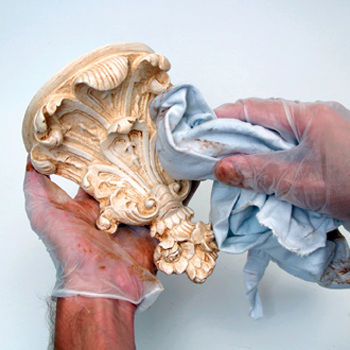
Step 8: Wipe surface and varnish if desired.
Wipe the surface again using the balled up rag to pull out the highlight and even out the glazed surface.
To protect the surface, a clear water-based varnish may be applied after antiqued surfaces have dried completely (4 hrs). A Satin or Semi-gloss sheen is best suited for this type of treatment.
Early American Style
Colonial Amercians drew inspriation from their European heritage. Curent design styles would filter across the ocean and become reinventedin early America. Proportion and scale took reign over ornementation, A neutral color palette of grey blue, greens and rose pinks is readily apparent.
Stucco Rustico - Aged Plaster
Stucco Rustico is a Traditional interior and exterior textured plaster that epitomizes the rustic old world charm commonly associated with Tuscan environments. I love this treatment for its ease of application and the natural, organic glazed appearance that results when using mineral based plasters and glazes. Whether a rough application or a smooth finish, this treatment holds true to the test of time and, in fact, feels as if time itself stopped to wash the walls personally.

The Rustic Color Palette
The Rustic Style color palette falls within a distinct range of color tones and is essential in creating a successful Rustic interior. By using the appropriate color tones you can create a variety of design styles ranging from Period and Historic, regional or thematic. Color helps define our experiences within an interior and exterior environment. It affects us on a physical, emotional, and spiritual level and can be calming and passive, expressive and vital.
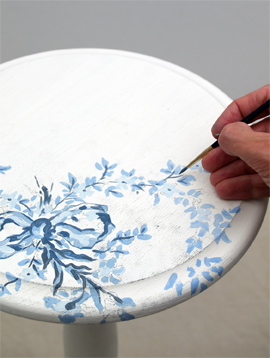
Painted Floral Details
Floral patterns used as accents in fabrics and furniture are common place details in the English Country home. These graceful and organic patterns complement the cozy interior of this style and work particularly well with lace window treatments, an heirloom tea service set and the natural and rustic charm of wooden ceiling beams and slightly irregularly textured walls.